In this example, we want to update the messaging of our text ads for a local attraction company in London based on the current weather.
The attraction company offers both indoor and outdoor activities which should be highlighted depending on the current weather on searches such as “Things to do in London”.
The aim is to update our Description Line 1 to reflect the weather, though this solution can be used to update any text aspects of an ad.
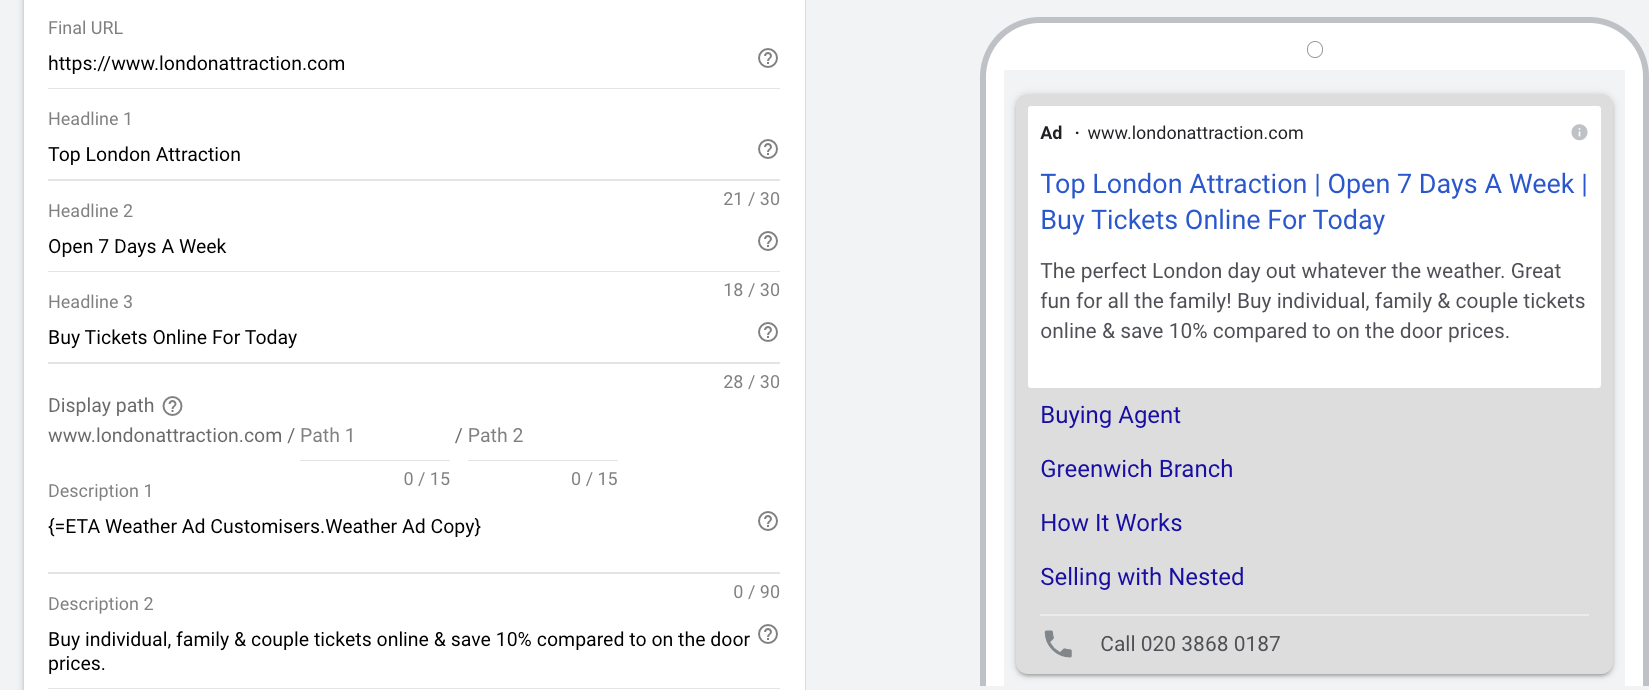
The finished product should look something like this:
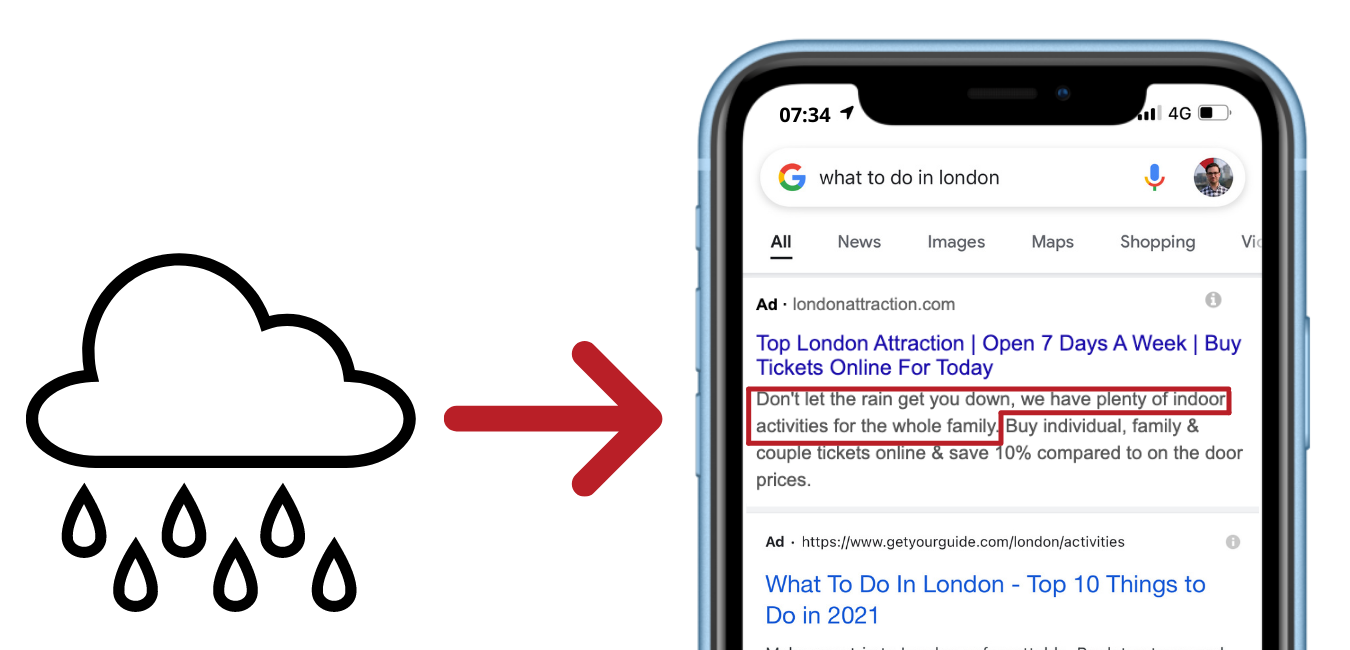
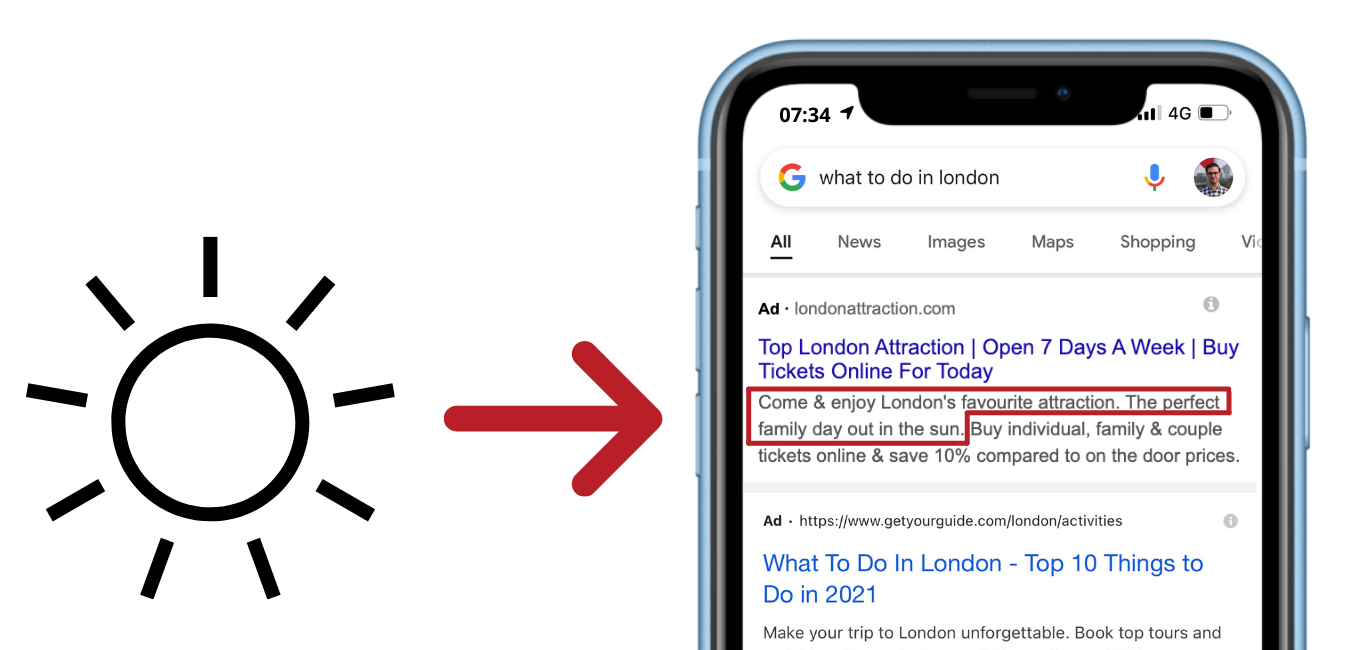
To achieve this, there are a couple of key processes we need to get in place:
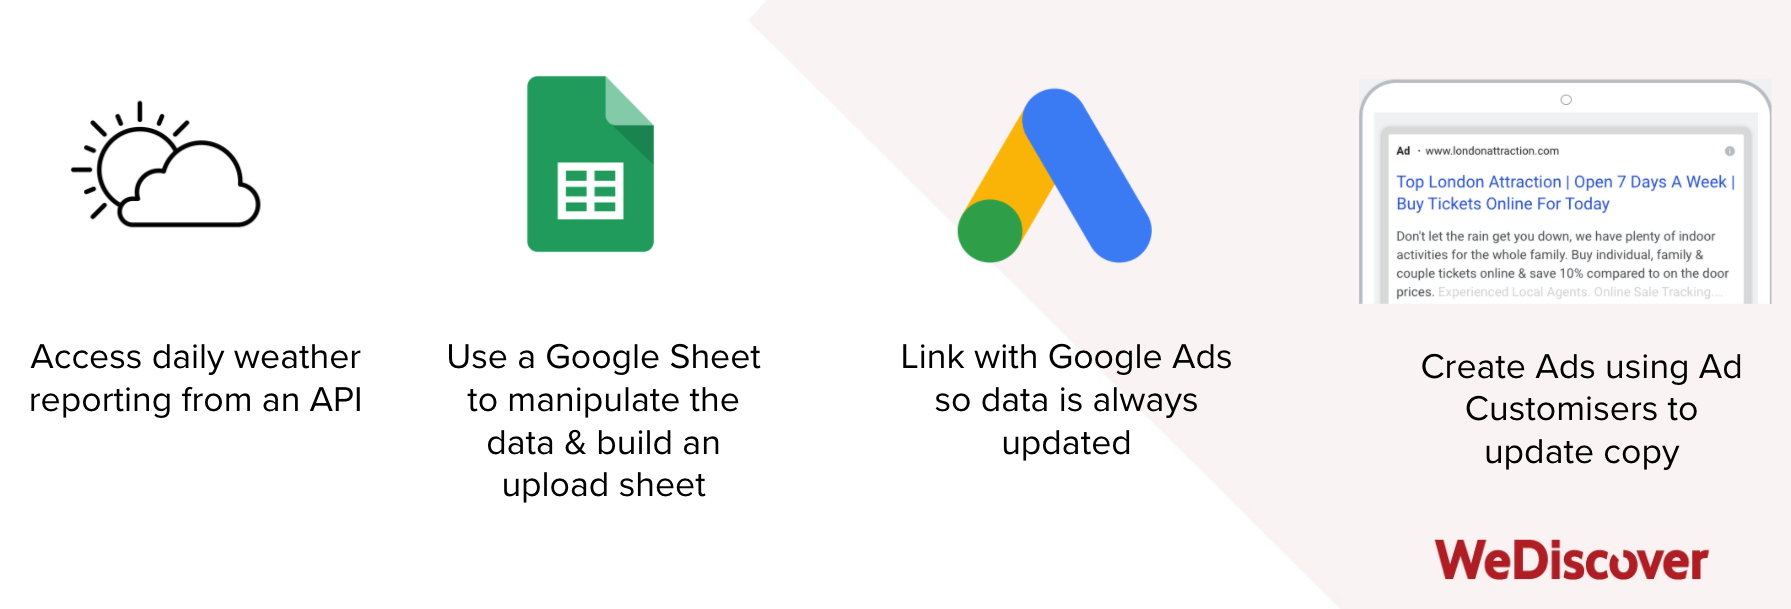
In this example, we will be using weather as our external data signal.
We will be using a main weather descriptor (Clouds, Rain, Clear, Snow etc.). However, this process can also be used for other data points (like temperature, etc.).
This is merely a simple example of how to utilise data signals with an easy to implement script. Combining ad customisers with external data sources opens up almost endless possibilities for dynamic ads.
Below we have a templated Google Sheet & script that can be implemented into an account. You can also access the script on GitHub here.
There are also step by step instructions on the process and script to allow customisation for other uses.
There are limitations to the script used in this example. It uses a single location that should correspond to the campaign targeting location. In this example, the campaign should target London, where our weather data is referring to.
The concept would scale to multiple locations but would require additional coding dependent on unique requirements.
Step 1: Accessing Weather Data in Google Sheets
The first step is being able to access up to date weather data that can be used as the signal to update our ad copy.
The easiest way to achieve this is by using an API and the Google Sheet script functionality. There are a few different weather APIs available but the one we will be using in this example is https://openweathermap.org/.
Open Weather Map has a Current Weather Data API that is available for both free and paid users which will work for this solution.
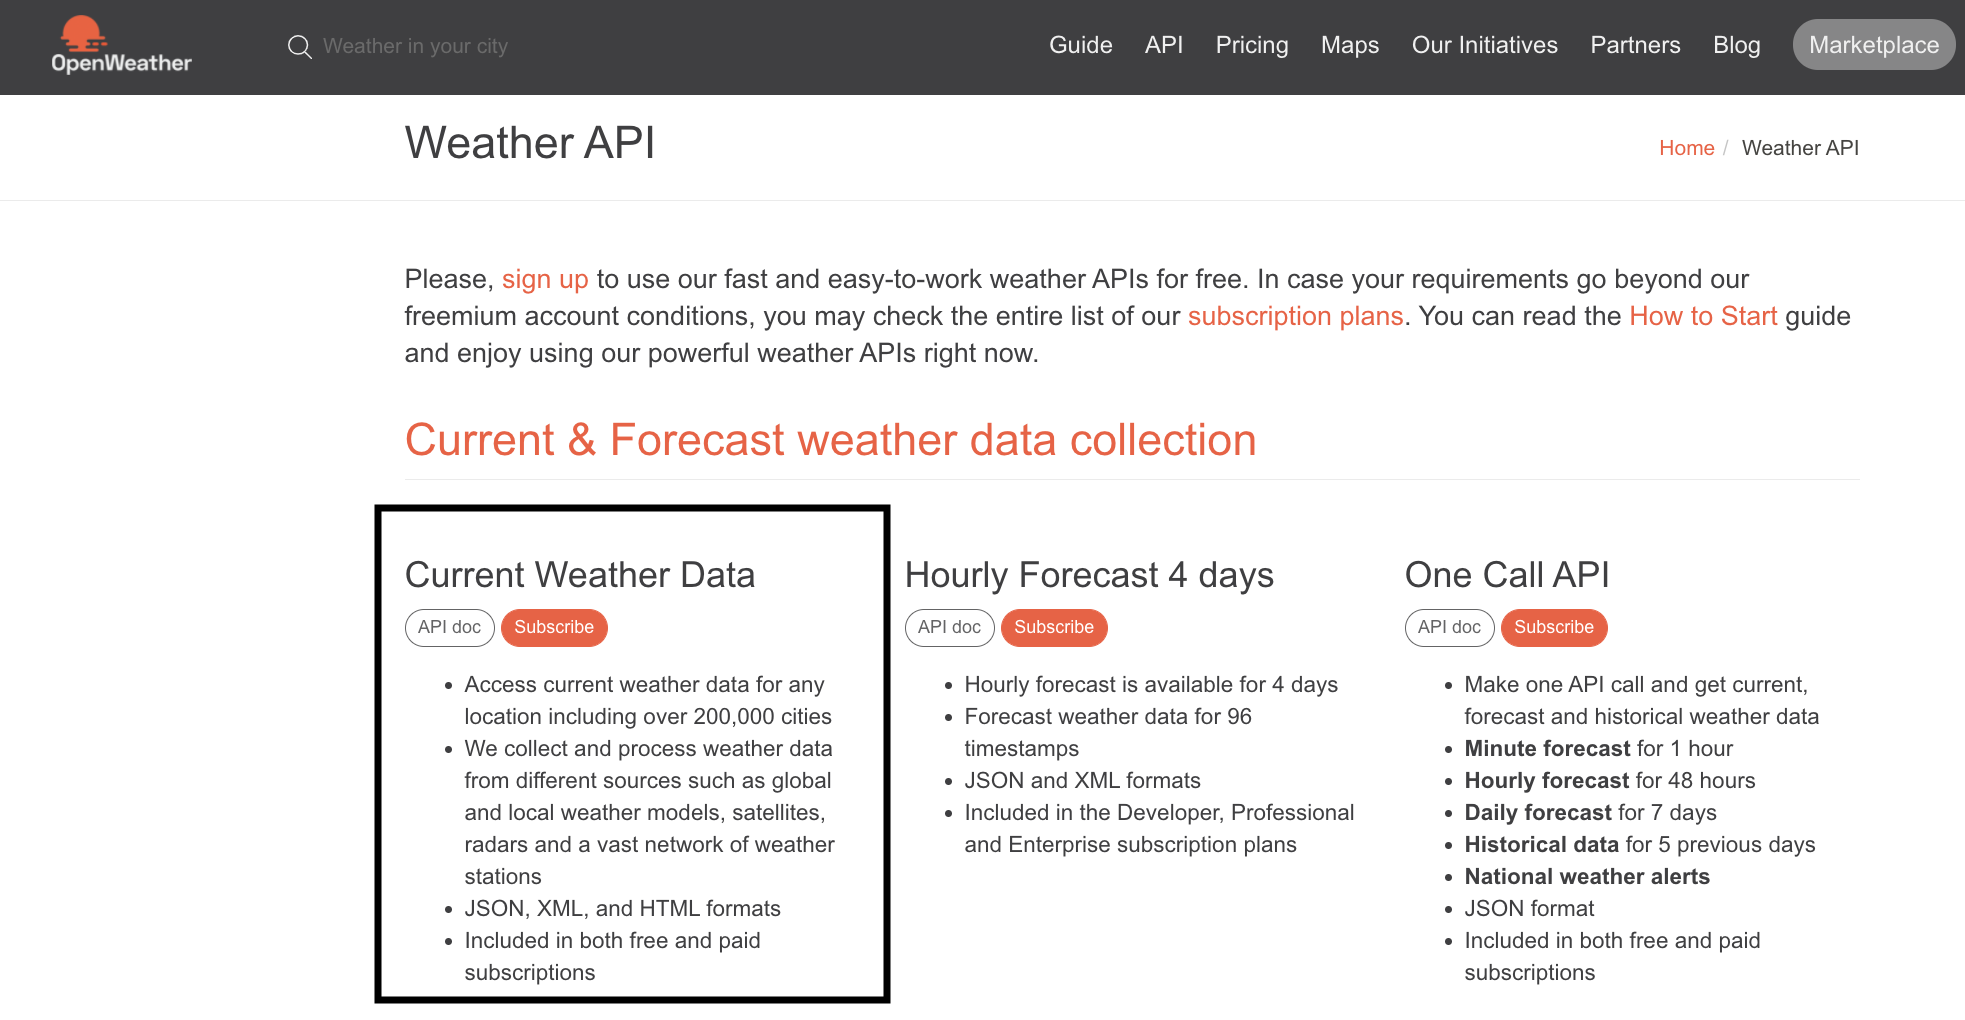
For this example, the Free option will work for us as we realistically will be making single figure calls to the API in a day, so we just need to sign up for the service:
Go to https://openweathermap.org/.
Select Pricing > Free – Get API key (as below) > Sign Up to the service

You should now have access to an API key. Click on your profile > My API keys to view this.
Your Key will be where the grey box is below. The key will be a unique string of numbers and letters. You can create multiple keys if you are setting this script up for multiple accounts.

Now we should have access to the weather data and the API key will allow us to access this data from an external program, in this case, Google Sheets.
1.2 Create Your Google Sheet & Script
1.2.1 Prepping Your Google Sheet
You can find a template file here if you want to use the “Main” weather descriptor (Clouds, Rain, Clear, Snow) as your trigger.
Alternatively, instructions for how to create your own from scratch are below.
The Google Sheet template has the following sheets:
Sheet 1: RSA Business Data Uploader
A template that pulls in the correct ad copy variant in an uploadable format for RSAs.
Sheet 2: ETA Business Data Uploader
A template that pulls in the correct ad copy variant in an uploadable format for ETAs.
Important: This sheet is uploaded and linked as a CSV meaning that only the first sheet is linked. For ETAs, this sheet should be moved to the first position. A separate sheet needs to be used for each ad type.
Sheet 3: Live Data
The result will be stored in A2
Sheet 4: Location
Define your location in A2. We have pre-entered London but this should be updated to your requirements.
Sheet 5: History
Daily results will be stored in columns A:C.
1.2.2 Adding Your Script
The script is already added to the template, so simply go to Tools > Script Editor. Add your unique API key within the “” on line 12. You can now move straight ahead to step 1.2.3 and schedule your script. You will have to review and approve permissions on first running the script.
If you want to make a custom script, we will break this down into segments below with detail on the process of each line of code. The full code can be seen below or edited from the template.
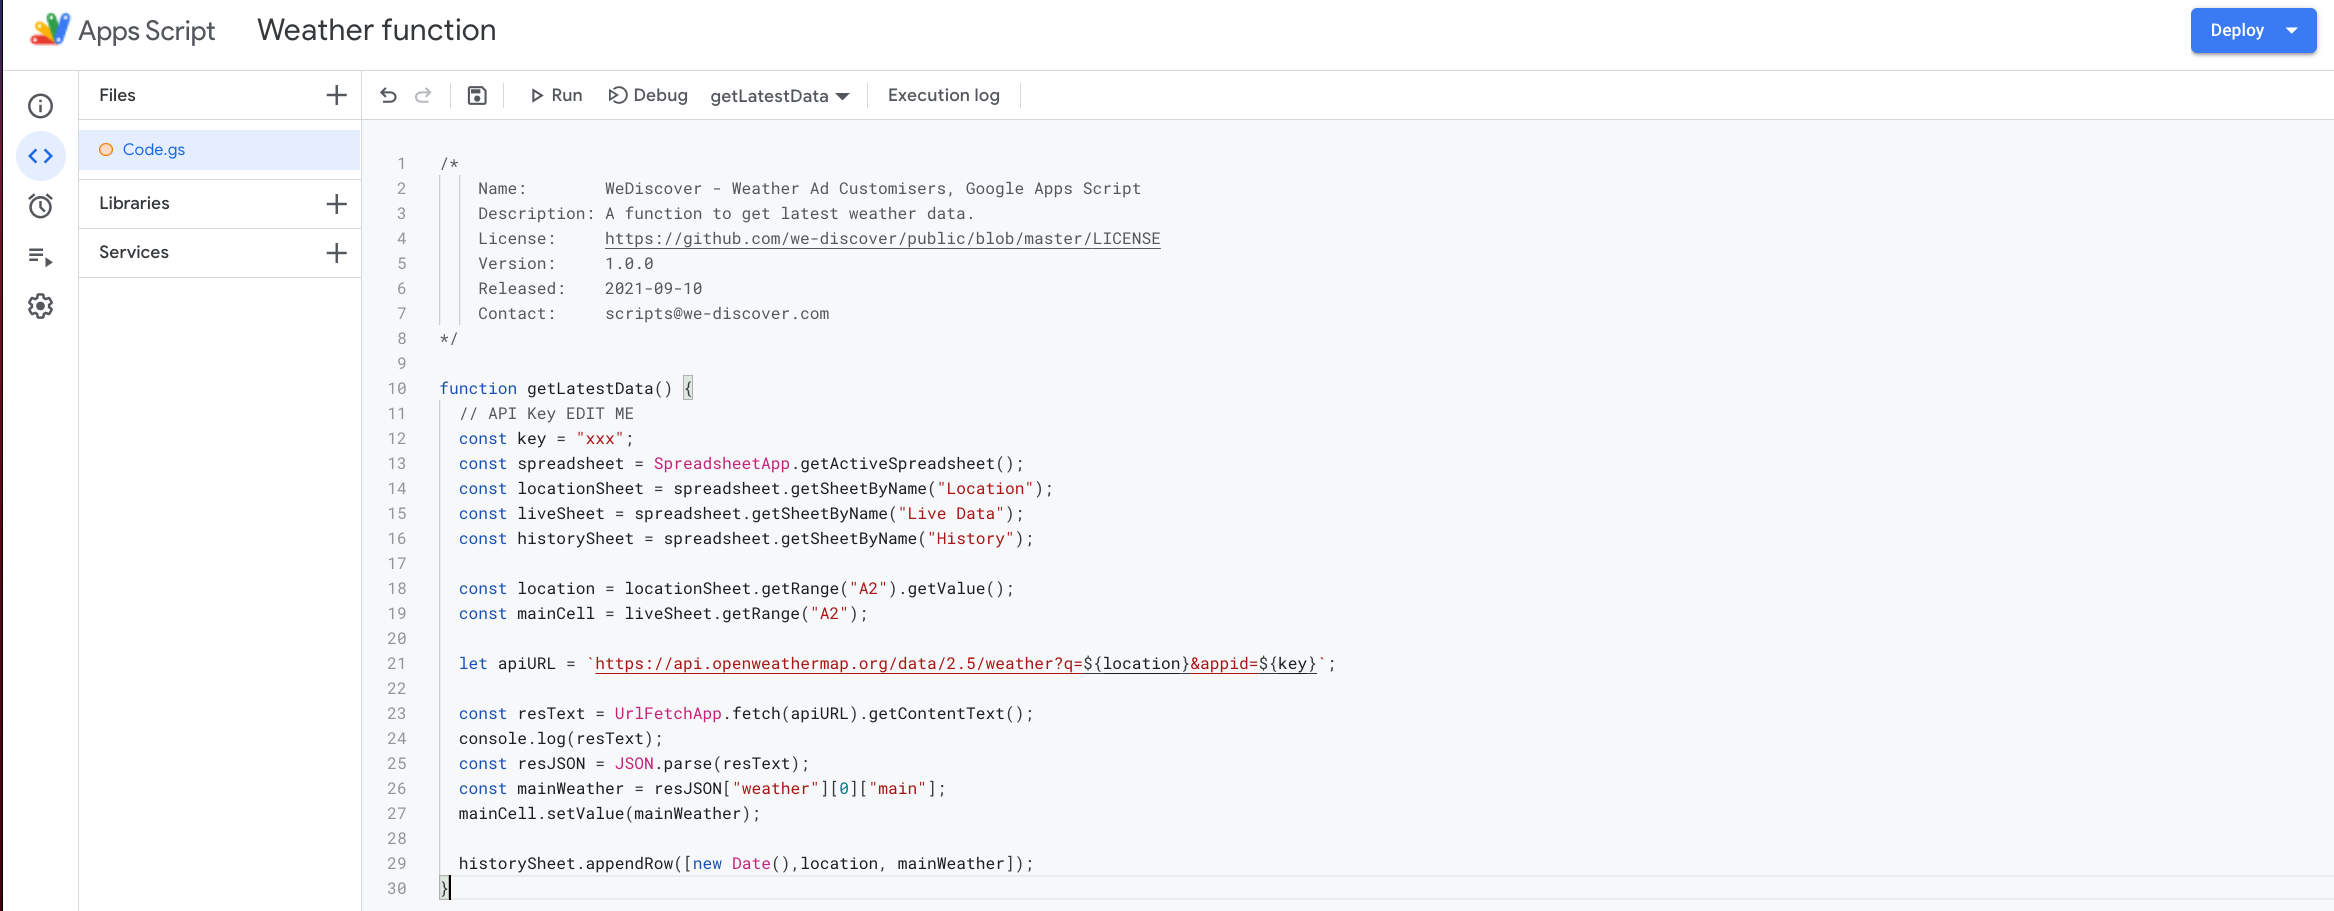
To kick-off, we need to name our project (e.g. “Weather Function”) and our function (getLatestData) in line 10.
We need to set our API key, Spreadsheet, pages and cells as variables.
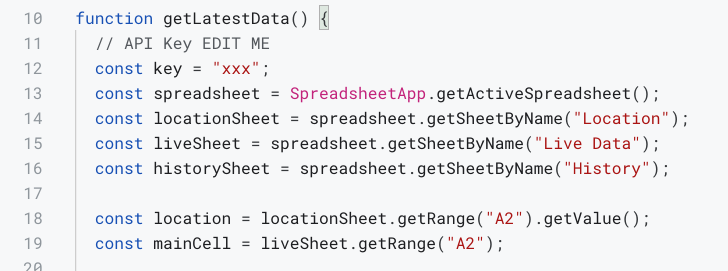
Line 12: const key = “42e6f8…”
This is your unique API key we created in Open Weather Map. This should be added within “ “.
Line 13: const spreadsheet = SpreadsheetApp.getActiveSpreadsheet()
Setting the associated spreadsheet within the variable spreadsheet.
Lines 14-16: setting the sheets we created earlier as variables by using the getSheetByName function.
Line 18: const location = locationSheet.getRange(“A2”).getValue()
In this line we are parsing a value from a sheet, the variable for the sheet named “Location” we created in line 14.
The cell reference is A2, so within this cell in the Location sheet, we need to ensure the location we want to pull weather data for is added.
Line 19: const mainCell = liveSheet.getRange(“A2”)
Setting a destination for the weather data. In this example, we are pulling the main descriptor of the weather (clouds, clear, rain) so we will name this variable mainCell. You may want to use sunrise or rainfall or average temperature. To do this you can either create more destination variables or edit this one.
Now we have our variables and location we want to call the API. To do this we need to refer to the API documentation and find the format to call current weather for a single location:
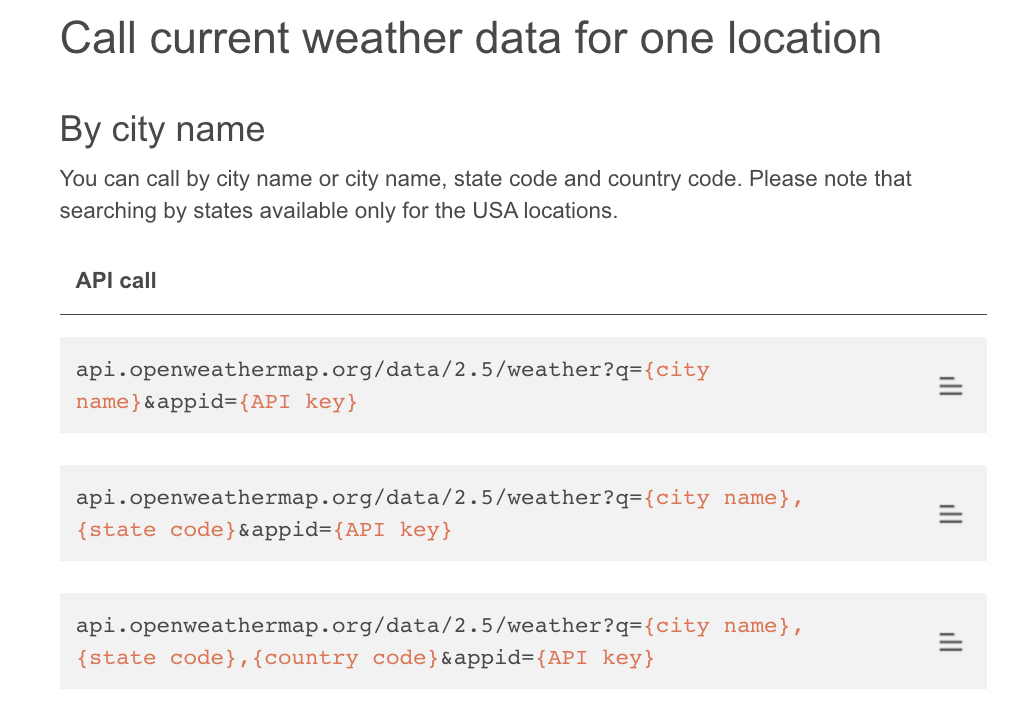
We have already set our Location and API keys as variables so we need to edit this call very slightly.
Also, note that there are a couple of different ways of calling a location.
When we run our script you may receive an error or null result if the location format is unrecognised by the API, so please refer to the documentation to ensure the location you have set is compatible.
To call the API within our Google Sheet we will create some more variables

Line 21: let apiURL = ‘https://api.openweathermap.org/data/2.5/weather?q=${location}&appid=${key}`
Here we set the API call as a variable. As we have set the location (line 18) and API Key (line 12) as variables, we need to escape the URL, using $, and then accessing the variables.
Line 23 const resText = UrlFetchApp.fetch(apiURL).getContentText()
This is where we actually call the API and store the result in the variable resText by using the prebuilt URLFetchApp function. .getContentText(). This will access Today’s weather data for our location.
Line 24 console.log(resText)
Though not necessary, now is a good time to log your API result to review your API call and which aspects of the data you want to push into your sheet to use in your ad customisers. Select run at the top of the window and you will receive a log of the result:

The result of our API call is a list of weather aspects for our chosen location. We are going to be using the main description of the weather, bolded below:
{“coord”:{“lon”:-0.1276,”lat”:51.5073},”weather”:[{“id”:804,”main”:”Clouds”,”description”:”overcast clouds”,”icon”:”04d”}],”base”:”stations”,”main”:{“temp”:289.35,”feels_like”:289.04,”temp_min”:287.68,”temp_max”:290.7,”pressure”:1032,”humidity”:77},”visibility”:10000,”wind”:{“speed”:2.57,”deg”:0},”clouds”:{“all”:90},”dt”:1630487125,”sys”:{“type”:2,”id”:2006068,”country”:”GB”,”sunrise”:1630473206,”sunset”:1630522080},”timezone”:3600,”id”:2643743,”name”:”London”,”cod”:200}
We will need to extract his aspect from the result by creating a JSON object:

Line 25: const resJSON = JSON.parse(resText)
Using Json.parse to convert the result into JSON
Line 26 const mainWeather = resJSON[“weather”][0][“main”]
Creating a variable that stores the main description (e.g. clouds). The weather result is wrapped in an array so we need to extract the first element of the array by adding [0]. This line of code will differ depending on which pieces of information you want to extract from the result. For example, if you wanted to use the Feels_Like aspect the line would be:
const arrayTest = resJSON[“main”][“feels_like”]
Line 27: mainCell.setValue(mainWeather)
We now need to set the result of our function into our mainCell variable in the Live sheet.
At this point, you can run your script and you should see the result entered into cell A2 in the Live Sheet:

Finally, we want to keep a log of the weather, and therefore the ad copy used on each day, within the sheet for future analysis:

Line 29: historySheet.appendRow([new Date(),location, mainWeather])
Using our historySheet variable, this line of our code will append the date and time the script ran (01/09/2021 07:25:05), the location used (London, England, United Kingdom) and the weather logged (Clouds). Each time the script runs, a new line will be appended below the existing data.
1.2.3 Scheduling Your Function
To ensure that the data is always up to date, we are going to schedule this script to run once a day.
To do this, go to Triggers which is the clock on the left side of the pain. If you are using the legacy script editor, the Triggers will be next to the Save button on the top ribbon.
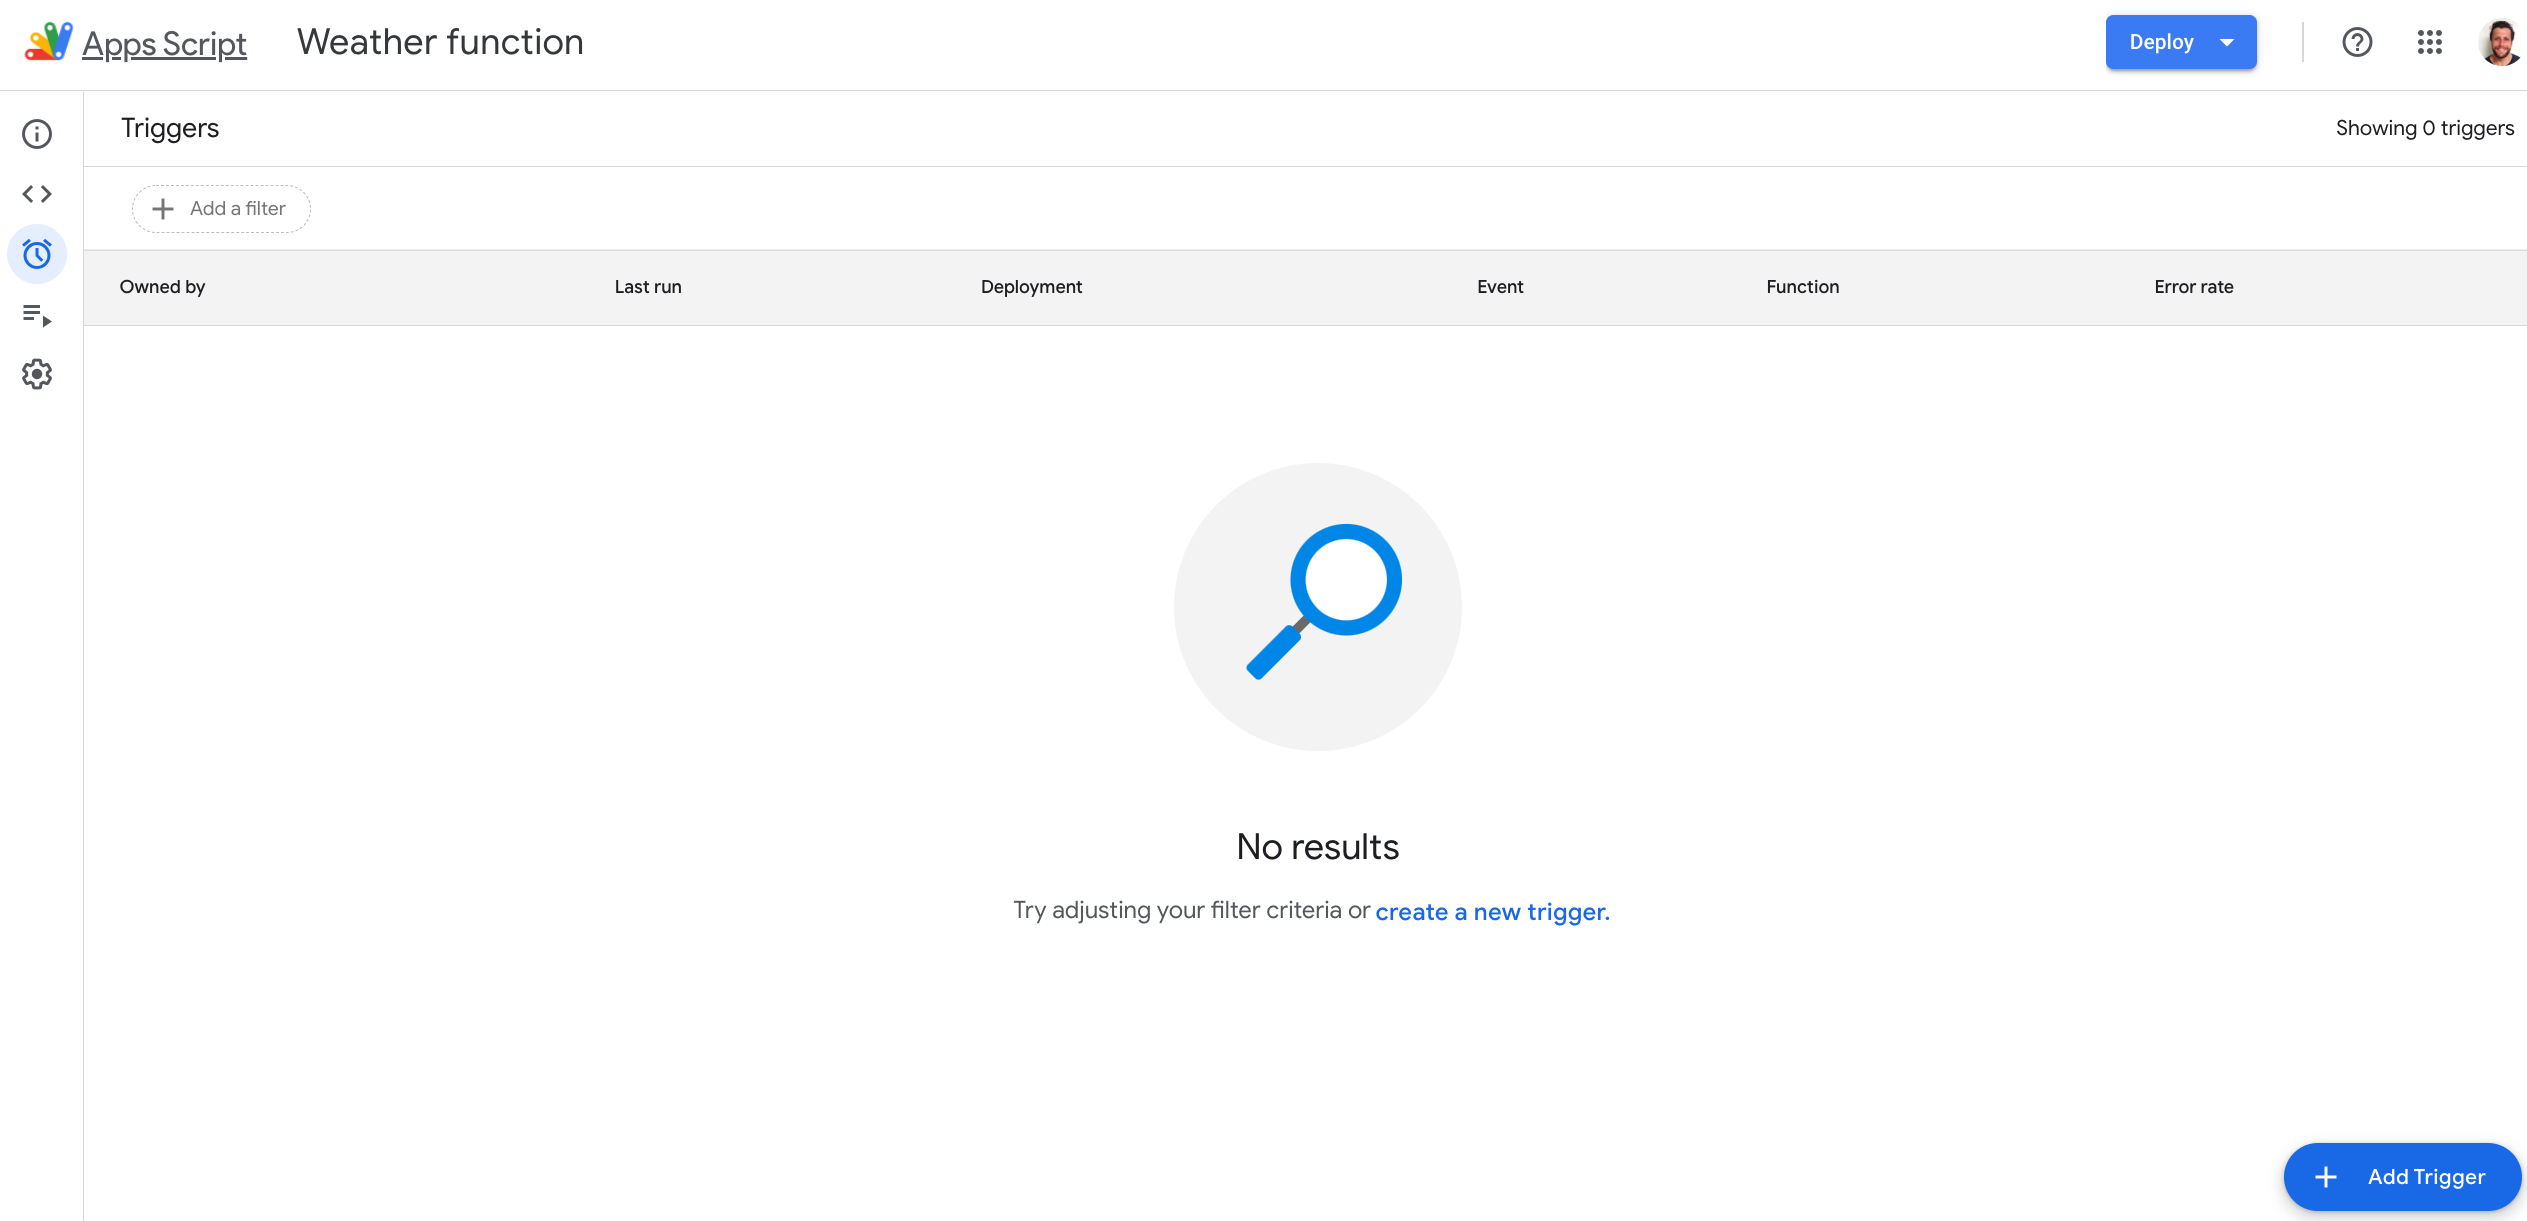
From Triggers, select Add Trigger and the following pop up will appear:
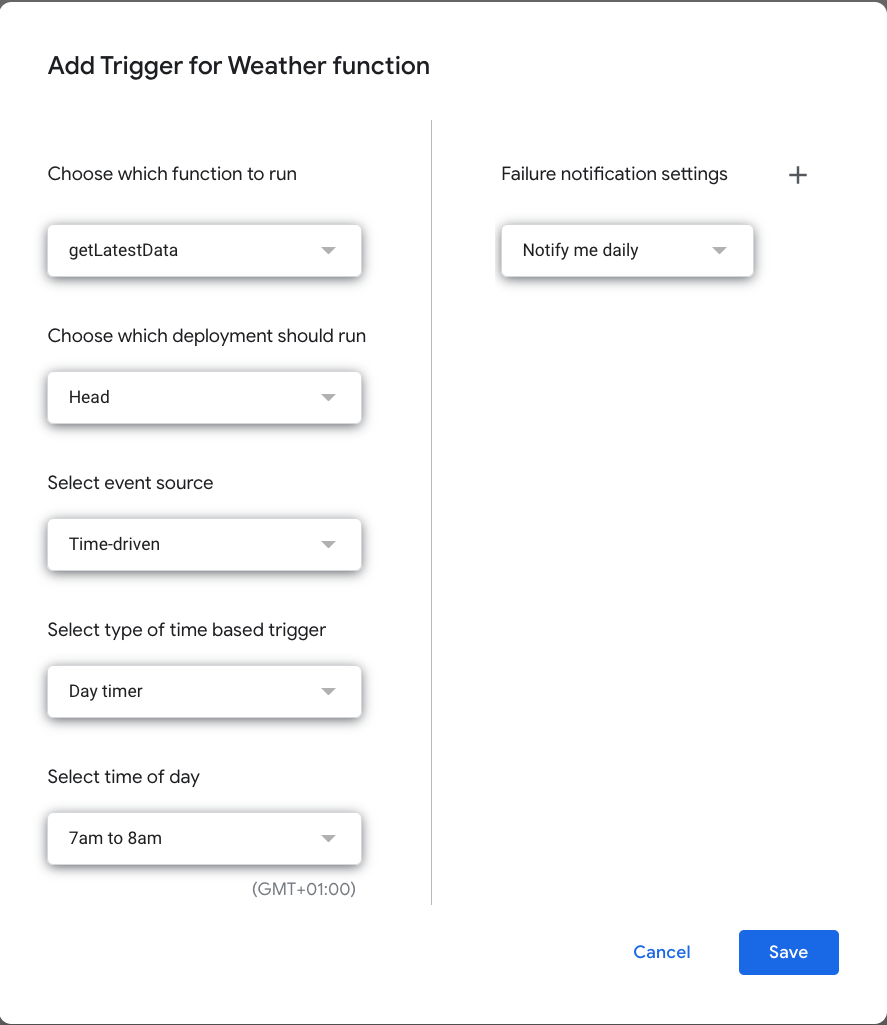
- Ensure the function (getLatestData) is correct.
- Select event source as “Time Driven”
- Select time – in this case, we only want this to run Daily but it can run at minute, hour, weekly and monthly intervals or at a certain point in the future.
- Click Save
We have set our function to run every morning between 7-8 am so the ad copy is updated for that day (you can also edit your trigger to run multiple times a day). We can view the log to see what weather was reported and when. In our log, we can see the classic English August weather of “clouds” every day:

Step 2: Building Your Business Data Upload in Google Sheets
Now that we have daily fresh data in cell A2 of the “Live” sheet, we need to convert this into a business data table we can use in Google Ads.
Ad Customisers work differently for ETAs and RSAs. In this example, we will go through building a business datasheet for ETAs first and then RSAs.
If you want to use Ad Customisers for both, we recommend you duplicate the template sheet to simplify the Google Ads linking process. We will cover this in the RSA section.
2.1 Creating your ad variants
2.1.1 Categorising Your Possible Results
Depending on the aspect of weather you are using, these steps will slightly differ. We are using the Main attribute, the result of which is a string. This means that there is a finite list of results that we can find in the API Documentation.
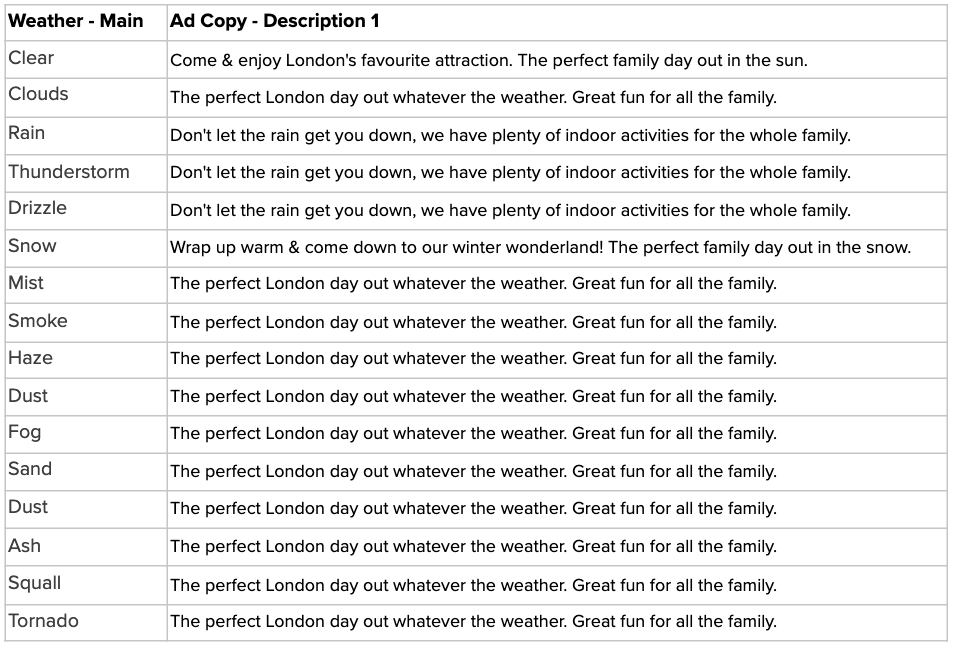
Using the documentation above, we can see there are 16 possible responses from our API request:

We, therefore, want to have an ad copy that corresponds to each of these attributes.
We could use these results directly in our ad copy but this is quite limiting.
Instead, we want to use these weather conditions as triggers for the copy. We don’t expect some of these to occur often (e.g. Tornado) though it is best practice to include some ad copy just on the off chance, even if it is a fallback.
You may have chosen to use a different weather attribute that would return a numerical value, such as temperature.
If you were using these as triggers, rather than pulling directly into copy, you would need to use logic within Google Sheets to categorise temperatures into segments that could be associated with copy.
2.1.2 Creating Your Ad Copy Reference Key
We now need to prepare our ad copy to be used for our results. As we only have 16 possible results, we will just add a copy for each weather event.
If you were using temperature, it could be an idea to segment possible results into Cold, Warm and Hot and have an ad variant for each.
Within this, we need to list our possible outcomes and their associated copy. Here is an example:
2.1.3 Creating Your Business Data Table in Google Sheets
Next, we need to convert our ad copy templates into an uploadable Business Data table that dynamically updates based on our weather results.
This should be the first sheet of the doc as our link to Google Ads will use the first sheet of the document only.
As mentioned earlier, this will need to be done separately for ETAs and RSAs. Below are two different sets of instructions for ETAs and RSAs.
Essentially, to create an update sheet for RSAs there is one additional step. Follow the ETA instructions first and then move onto RSAs. Similar to the script, the below work is done within the templates but instructions are below should you wish to make edits.
ETAs
We can either use targeted or universal ad customisers within ETAs. The difference between these is that a targeted will be triggered by one of the below, while a standard is just called within the interface:
- Target Campaign
- Target Ad Group
- Target Keyword
- Target User Location
We will be using a standard ad customiser table but will call out where to add changes we need to, should you want to use a target.
To build this, we need to create and upload the first iteration of the table. We have the following column titles in our “ETA Business Data Builder” sheet:

Using the Location and Weather columns will future proof us should we want to pull weather details for multiple cities in the future. For now, we will stick to just using London.
- Cell A2 should be up to date with the location you have set in the Location sheet.
- Similarly, the weather cell (B2) should update whenever the weather changes and therefore reference the original cell.
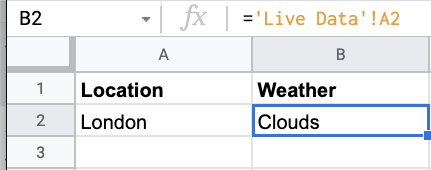
If we were accessing data for multiple locations, we would need to use a Vlookup here to pull the correct weather data. Cell B2 will now automatically update should the weather result change.
- We then just need to use a vlookup function using the Weather as a reference to pull the associated ad copy from our templates sheet:

We now have an ad builder template that will update in line with our script.
If we wanted to use a Target Campaign/Ad Group/Keyword we would just need to add an additional column with the correct title and then have a row for each Campaign/Ad Group/Keyword we wanted to target:

RSAs
If you are planning on scheduling your ad uploads for both RSAs and ETAs, make a copy of your sheet now and rename the copy to be the RSA uploader. If you are only creating RSAs, move on to the next steps in the original sheet.
RSA ad customisers operate slightly differently to ETAs. However, it is still relatively straightforward to build and update some weather-based RSAs descriptions.
Rather than using a completely customisable sheet, RSAs use “Ad Customiser Attributes”. To create these, we simply need to create one more sheet named RSA Business Data Uploader with 3 columns:
- Attribute – this is the name you will refer to in your ads & must <40 characters – e.g. “RSA Weather Copy”
- Data Type – typically this will be Text but could also be Number, Price, Percent
- Account Value – this is our ad copy so we can just reference the “Weather Ad Copy” (cell D2) from our ETA sheet.

Step 3: Uploading & Scheduling Your Business Data
We now have regularly updating Google Sheets in the format required to update ad customisers in Google Ads for ETAs and/or RSAs. The next step is to link this to Google Ads and make it accessible within the interface.
Again, this process differs for ETAs and RSAs so please follow the instructions for either or both.
3.1.1 Creating ETAs
First, we need to download a static copy of the business data upload sheet as a CSV by going File > Download > CSV. Ensure “ETA Business Data Uploader” is the first sheet in the spreadsheet.
Once downloaded we can upload it into the Google Ads interface. Go to Tools > Set Up > Business Data > New (+) > Ad Customiser Data For Text Ads.
Name your Business Data Table (e.g. “ETA Weather Ad Customisers”) and choose the file you just downloaded.
3.1.2 Creating RSAs
RSA ad customisers require us to create an attribute in the interface which we can then use bulk uploads to update and maintain. You should still download a CSV at this stage for use later, so go File > Download > CSV on your RSA uploader sheet.
Within Google Ads go to Go to Tools > Set Up > Business Data > Ad Customiser attributes on the left-hand pane.
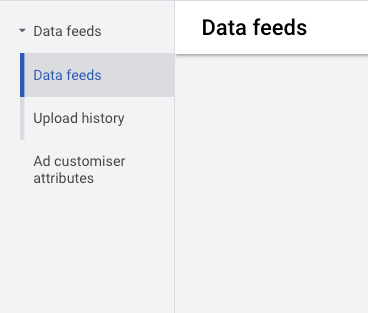
Select New and you will be given these options:
 Under ‘Attribute’ we must enter the exact text we used in our RSA upload sheet earlier, in our case, it was “RSA Weather Copy”. We also need to set the data type, for us, this is ‘Text’, and then Create.
Hover over the ‘Account Value’ cell and click the edit pencil which will open a pop-up. Copy and paste your weather-based ad copy from your sheet and click save:


3.2 Updating Your Customisers
You can now access your ad copy in an ad customiser. However, at this point, your business data feed is static and will not reflect the changes your script is making.
We are going to use the Google Sheet linking for our schedule, though you can use HTTPS or SFTP. This process is different for ETAs and RSAs, so they will need to be done separately.
RSAs
To schedule the upload:
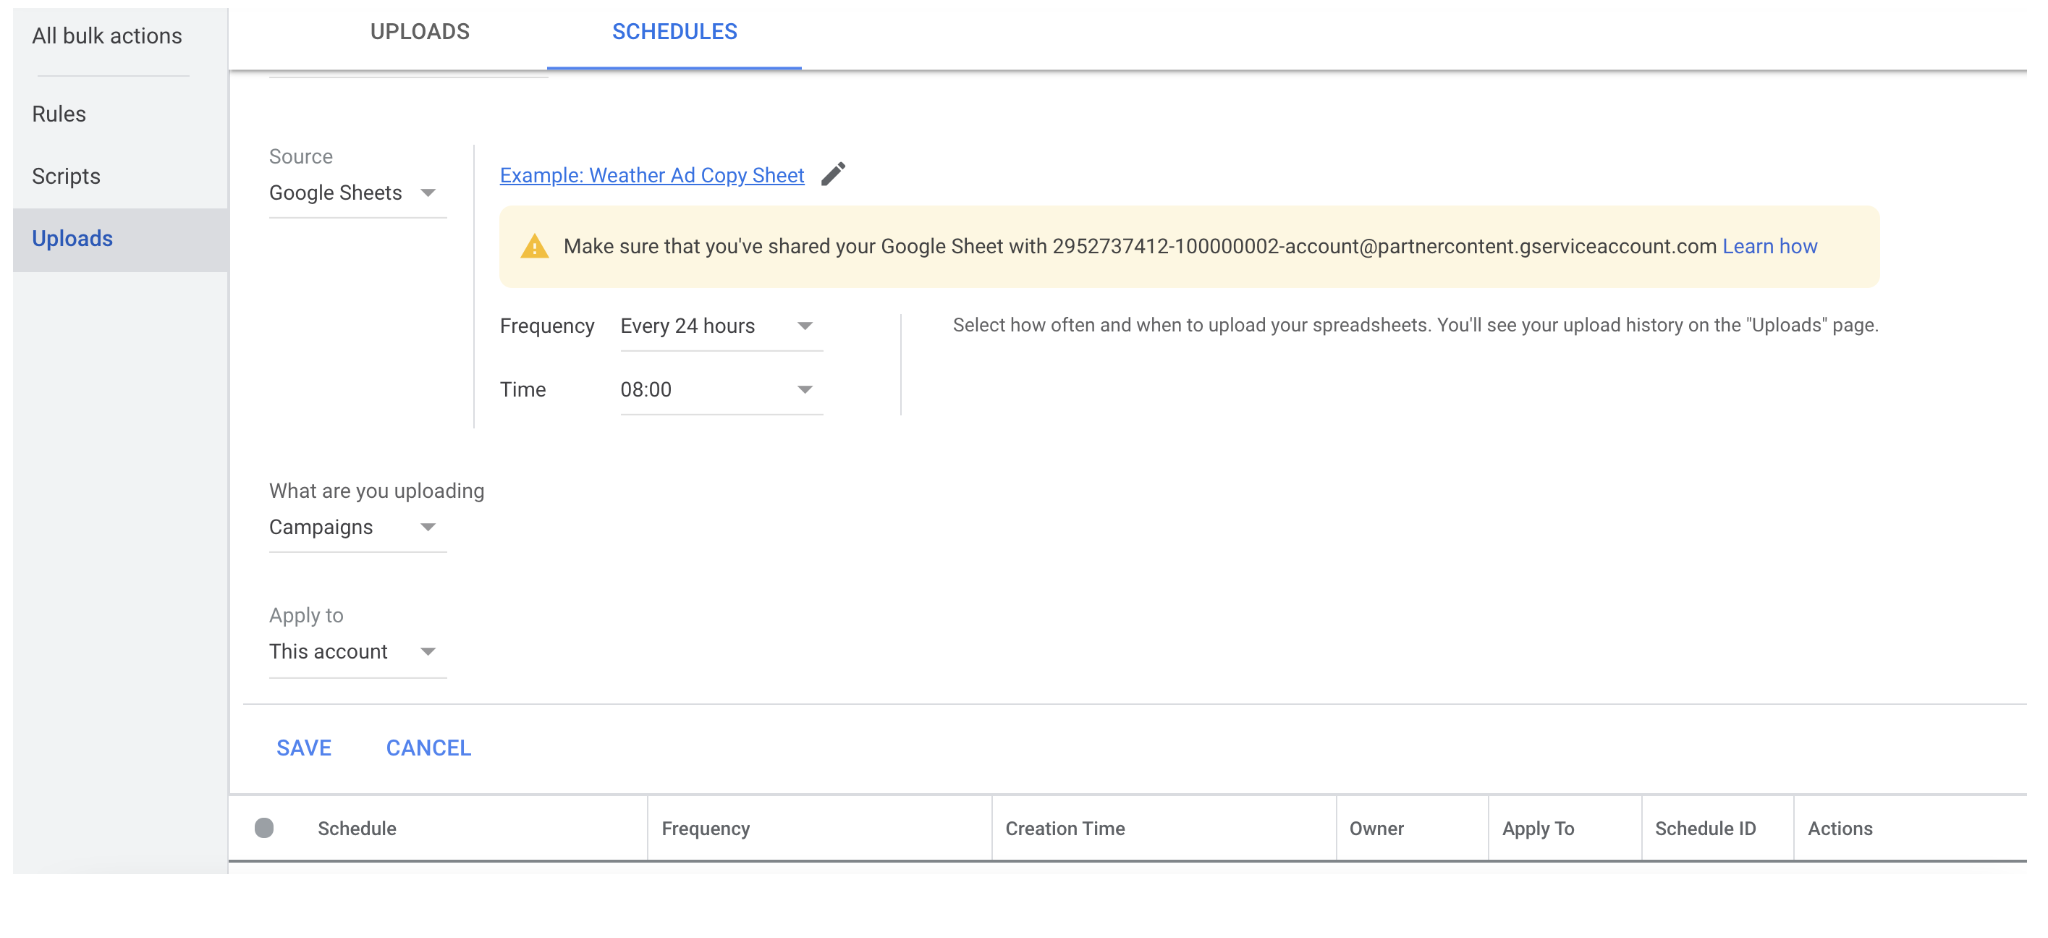
1) Tools > Bulk Actions > Uploads and then select Schedules
2) Select New (+) and give your scheduled upload a name
3) Set Source to Google Sheets and select the relevant sheet. Note: the sheet used will be the first sheet on the doc, so make sure the sheets are correctly ordered.
4) You will be given an email address by Google Ads to share your sheet with (Highlighted below). Add this as a user to the relevant sheet by clicking Share and adding the email address.
5). Set the schedule to Daily and the time to recently after your trigger for your weather function. Save.
ETAs
To schedule the upload:
1) Tools > Setup and then select Business Data
2) Select the Data feed you just created for your ETAs
3) On the left-hand menu, select Schedules, then select (+) New Schedule
4) For the source, select Google Sheets, then select “Link an existing Google Sheet” then select your ETA Weather Google Sheet.
5) Choose your Frequency (we would suggest “Every 6 hours”). Then select “Save”.
Step 4: Referencing the Ad Customiser in Ads
The final step is to simply call the ad customiser data within Google Ads. The notation differs very slightly for ETAs and RSAs and we will cover both.
Tip: if creating ad customiser ads at scale, create one within the interface and then use editor to copy the notation across your account(s). Google Ads interface uses autofill to ensure notation is correct, meaning no embarrassing errors within your ads.
ETAs
Within your add, simply { to start the process, bringing up the function options:
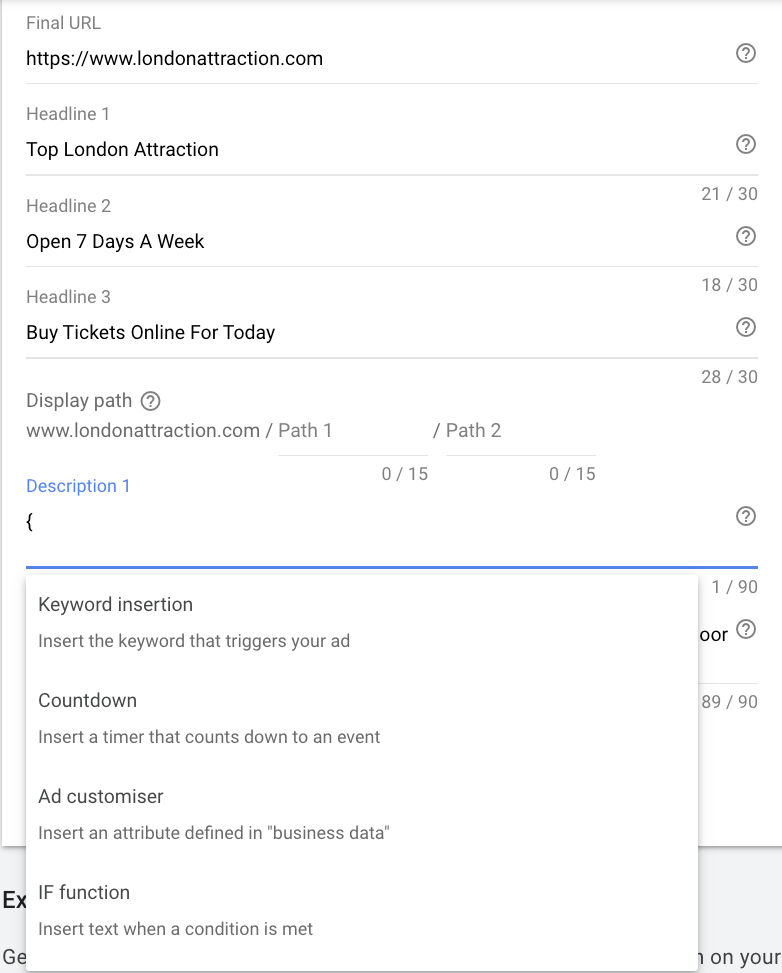
Select Ad Customiser and then the relevant ad customiser we have built.
Make sure you select the correct column (in our case Weather Ad Copy). The final function should look like {=ETA Weather Ad Customisers.Weather Ad Copy}. You can also add a fallback, however as we have predetermined any possible description line in our sheet, there will be no danger of our description being over the character limit.
RSAs
Calling an ad customiser works very similarly in an RSA than it does in an ETA, just remember you must have built out a separate customiser table and Google Sheet for each ad format.
In your RSA description, enter { and select Ad Customiser. You will then be given a list of attributes and click your weather ad customiser from the drop-down menu. In our example, our final function looks like this {CUSTOMIZER.RSA Weather Copy}. Again, you could add a fallback but because we have a finite number of possible descriptions that are all below the character limit, we do not need to do this.
Final Thoughts
Importing weather data as an API is only one example of how to leverage external data and ad customisers to create dynamic ad copy within Google Ads.
The weather is not going to be an influencing factor in the conversion journey of all industries. However, the thought process & method above will be applicable to other data sources including publicly available APIs and internally maintained feeds.
There are a wide variety of APIs available, see this API Directory for a searchable list, many of which could theoretically be used to update ad copy. Examples could include Currency or Stock Price and trending content & news.
Almost any information available to regularly update a Google Sheet should be able to trigger your ad copy updates to create truly relevant and dynamic content.


